Moving your website to a new host can get complicated, and you can end up with a fair few migration bugs along the way. You have probably already had to switch from one host to another, or simply push a local project into production. In this tutorial I go through, step by step, how to migrate your WordPress to its new host.
1 – Back up your website files
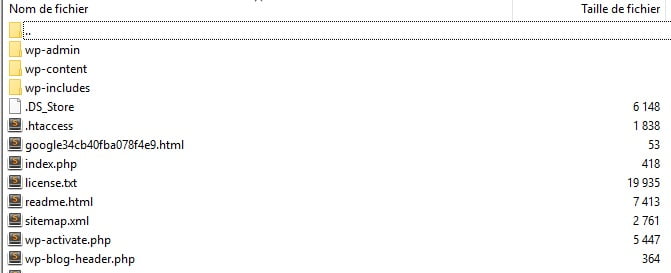
The very first step is simply to back up the whole site. This is good practice before any major change: keep a copy of everything in case you hit the slightest problem, if only for peace of mind.
Plenty of plugins will back your site up for you, but we are not going to dwell on those. I would rather explain how to do it by hand with a very well-known FTP client, FileZilla. In FileZilla, enter your details to connect to your host and copy every file of your website into a folder on your computer.
That includes the .htaccess file, which may be hidden depending on your operating system.
While FileZilla copies your site onto your local machine, we can get on with the next step: exporting the database.
2 – Export the WordPress database
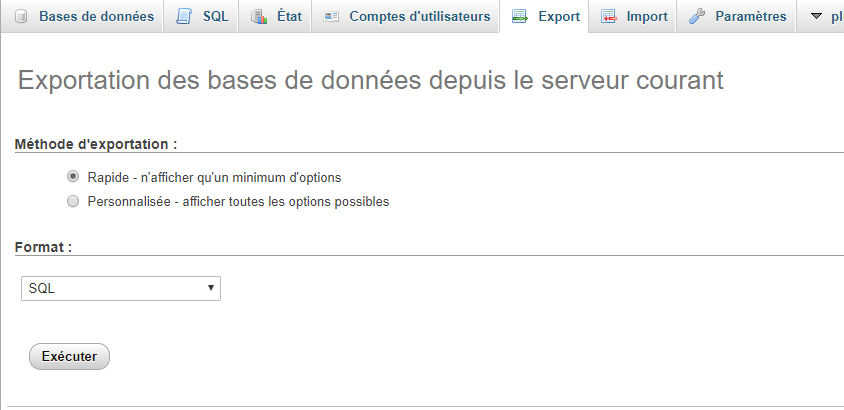
Exporting your database is a simple process that takes only a handful of actions. Connect to your MySQL server with a client, or with the phpMyAdmin your web server provides. Pick the database that holds your WordPress data from the list on the left and, once it is selected, click the Export tab in the navigation menu.
The default settings give you a quick export in SQL format, and that is the format to go for if you want your data out without trouble. Click the Go button and the export starts, a file is downloaded to your local computer. If the import later fails because of the version gap between your two MySQL servers, and you are using phpMyAdmin, its custom export options offer what it calls Maximise compatibility with a database system or an older MySQL server: that option can save your life when the two MySQL servers refuse to get on.
Once the database export and the FTP transfer of your files are both finished, you are ready for the next step.
3 – Create the WordPress database and import your data
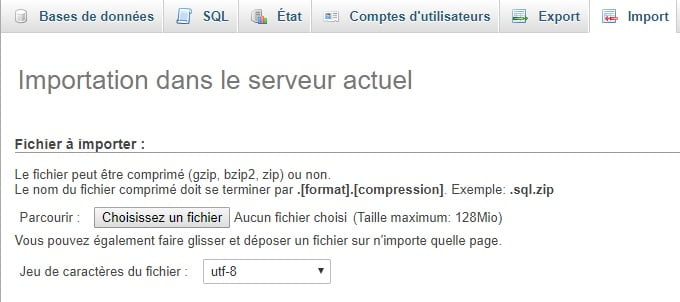
Before the migration to the new host can start, we need an environment for a WordPress install. That means creating a database you can import your SQL data into.
Log in to your new host. For this guide we will use phpMyAdmin once again. If your host does not offer phpMyAdmin, ask their support how they expect you to create new databases.
The steps to create a database are straightforward:
- Open phpMyAdmin and create a new database with a sensible name for your site.
- Go to the Import tab and click Choose file
- Then click Import.
- Open the wp-options table and change the siteurl and home options so they point at the new domain.
4 – Edit the wp-config.php file
Go to the folder on your local machine where you downloaded your website files. In it sits a file called wp-config.php, which controls access between WordPress and your database.
Make a copy of that file and store it in another folder on your local machine. You need it to undo the changes we are about to make, should anything go wrong later on.
Open the original file in your text editor and make the following three changes:
1. Change the database name
Look for this line:
define ('DB_NAME', 'nom_de_votre_base_de_donnee_base'); The db_name part of that line currently holds the name of the MySQL database on your old host. It has to be changed to the name of the new database you have just created.
2. Change the database user name
Just below it, you will find the line:
define ('DB_USER', 'nom_utilisateur_de_mysql'); In that line, change the db_user part from your old host’s user name to the new user name you have just created.
3. Change the user password
Then edit the third line:
define ('DB_PASSWORD', 'db_pass'); As with the others, the db_pass section of this line has to be changed to the new secure password you created for your MySQL user.
4. Change the address of your MySQL server
Finally, edit the fourth line:
define ('DB_HOST', 'db_host'); the db_host section of this line has to be changed to the new address of your database server, if your MySQL server happens to listen on a specific port, add :XXXX to point at the right one.
define ('DB_HOST', 'db_host:1445'); Save wp-config.php and close the file.
5 – Upload the WordPress files to your new host
Now that the new database is ready and the wp-config.php file has been reconfigured, it is time to start uploading the files to your new web host.
Connect with your FTP client and go to the public folder of your website, usually www, though that varies with your host and the way it is set up.
With the remote directory selected, you can upload your site files, which should now include the modified version of wp-config.php. As with the earlier download, this can take a while.
Do not delete those files from your local machine once the upload is over. You still need them until the final steps are done.
6 – Update the permalinks
Finally, to wrap this tutorial up, go to your WordPress admin area, into Settings -> Permalinks, and save the settings without changing a thing: that overwrites the permalinks still holding your site’s old URL and fixes the dead links.
If you hard-coded links in your posts, you can edit the SQL file you exported earlier and run a search and replace, from your old domain www.anciendomain.com -> to your new domain www.nouveaudomaine.com, save the SQL file and redo step 3.
···